This programming cable is intended to be used with the computer usb port for motorola GM360/GM338 radio.
The Motorola GM360 series radios are robust, reliable mobile radios widely used in commercial and amateur radio applications. One of the key aspects of maintaining and customizing these radios is the ability to program them using specialized software. However, the official Motorola programming cables can be expensive and sometimes difficult to source. This guide will walk you through creating your own ribless programming cable for the GM360, GM338, and GM300 radios.
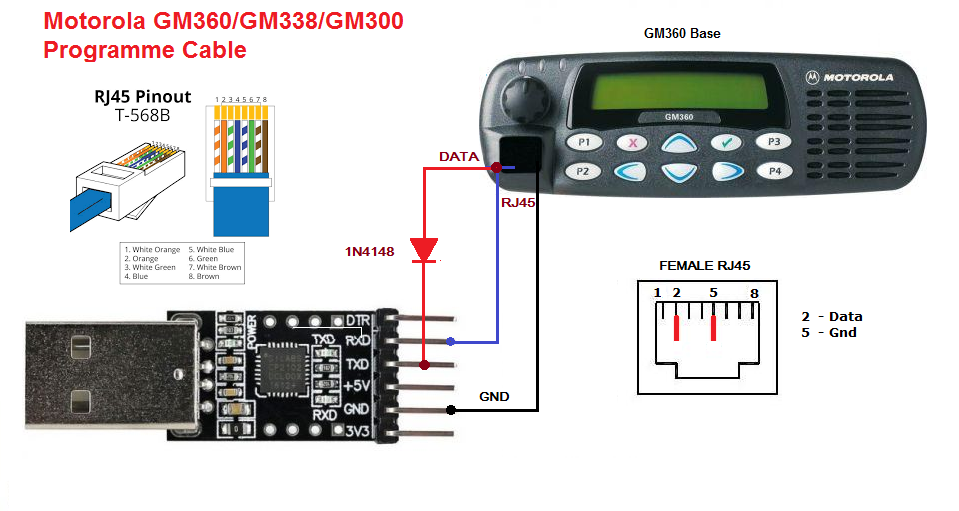
Understanding the GM360 Programming Interface
The Motorola GM360 series uses a simple serial interface for programming, accessible through the microphone jack on the front of the radio. Unlike some other Motorola radios that require RIB (Radio Interface Box) units, the GM360 can be programmed directly with a properly wired cable.
Key Components Required
To build your own programming cable, you’ll need:
- FTDI USB-to-Serial adapter (or any similar TTL serial converter)
- Female RJ45 connector (8-pin modular connector)
- 1N4148 diode (signal rectification)
- Appropriate gauge wire (22-24 AWG recommended)
- Basic soldering equipment
The 1N4148 diode serves a crucial function in this cable design. It provides signal isolation and ensures proper data flow direction between the computer and radio. The diode is positioned between the FTDI module’s transmit (TXD) line and the radio’s data line, preventing signal conflicts during bidirectional communication.
Serial Port Settings
When using the programming cable, configure your software with these settings:
- Baud Rate: 9600 bps
- Data Bits: 8
- Stop Bits: 1
- Parity: None
- Flow Control: None
Connection Process
- Connect the USB end to your computer
- Install FTDI drivers if not already present
- Connect the RJ45 end to the radio’s microphone jack
- Power on the radio
- Launch programming software and select the correct COM port
- Read from or write to the radio as needed
When building and using this programming cable:
- Always power off the radio before connecting/disconnecting the cable
- Use proper ESD precautions when handling electronic components
- Double-check all connections before first use
- Never force connectors – they should fit easily when properly oriented
Whether you’re a commercial radio technician, amateur radio operator, or electronics enthusiast, this cable design provides an excellent solution for GM360 series radio programming needs. With basic soldering skills and common electronic components, you can create a professional-quality programming tool that will serve you well for years to come.
